Recently I wanted to test an Android application and had to use an Android Emulator. While Android Studio’s emulator works fine, I had difficulties making it run because you can either have it rooted without Google Play Services or with Google Play Services but not rooted.
Export Burp Certificate
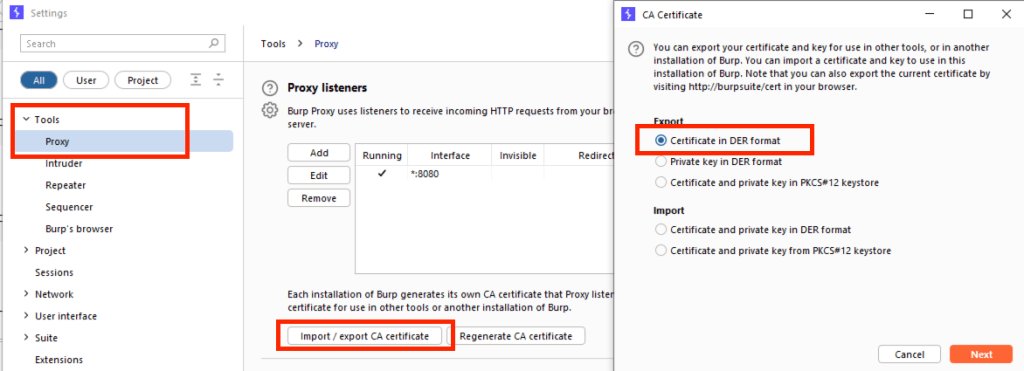
By default Burp Suite exports the certificate in .DER format, which needs to be converted into .PEM format, with openssl. To export the certificate navigate to: Settings -> Tools -> Proxy and on the Proxy listeners section select import / export CA certificate. Save the file to a location of your choice. In my case I saved it as burp.der on my Desktop folder.

Convert the Certificate
I was following this article, and what Android needs is the subject_hash_old as a filename for the certificate, in pem format with 0 as extension. So firstly, the extension needs to be converted to using openssl.
$ openssl x509 -inform DER -in burp.der -out burp.pem
$ openssl x509 -inform PEM -subject_hash_old -in burp.der -in burp.pem
9a5ba575
-----BEGIN CERTIFICATE-----
MIIDpzCCAo+gAwIBAgIEH7BDzzANBgkqhkiG9w0BAQsFADCBijEUMBIGA1UEBhML
...
After the file is converted, the subject_hash_old value is presented on top of the certificate. In my case it was 9a5ba575, so I renamed the certificate like suggested.
$ mv burp.pem 9a5ba575.0
Transfer the Certificate to Genymotion
The certificate needs to be transferred to the device’s sdcard, using adb or any other way (HTTP download). By default adb should run as root on Genymotion, but in case you get a permission error, start by running adb root. In case you already have root permissions an error will be displayed: adbd is already running as root
$ adb push 9a5ba575.0 /sdcard/
a5ba575.0: 1 file pushed, 0 skipped. 6.3 MB/s (1326 bytes in 0.000s)
The file needs to be transferred to the /system/etc/security/cacerts/ where the Root Certificates are stored. When I tried to move the certificate to the directory, I was getting an error like shown below:
# mv /sdcard/9a5ba575.0 /system/etc/security/cacerts/
mv: /system/etc/security/cacerts//9a5ba575.0: Read-only file system
In this case I had to remount the root file system and then I was able to move it. After just give it the correct permissions as required 644.
# mount -o rw,remount /
# mv /sdcard/9a5ba575.0 /system/etc/security/cacerts/
# chmod 644 /system/etc/security/cacerts/9a5ba575.0
Finally, reboot the device and the certificate will be inside the Root Certificates. To confirm, open on your Android device the Settings menu and search for Trusted Credentials. You will see the PortSwiggers certificate in your Root Certificate directory.
